How to install a skin in Minecraft PE
- Android: 4.0
- Updated
- Language: English
- Current Version: -
- Developer: -
- Category: Games
Description:
How to install a skin in Minecraft PE?
It must be known to everyone that Steve in Minecraft Pocket Edition is the default player skin. The game allows us to change the appearance. So why not take advantage of this? The detailed steps are described below. Everything is pretty simple.
Steps.
- The site has a section Skins . Find it, download the skin you like from there.
- You will have a ZIP archive . Unpack it in a convenient place for you.
- Be sure to launch Minecraft PE.
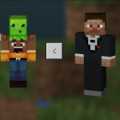
- Below the 3D character model there is a hanger icon - this is the choice of character skin. Open it.
![How to install a skin in Minecraft PE]()
- You will see all available skins, there will be an empty space next to them. You need to click here.
- "Choose a new skin" - this button will pop up. Click on it.
- Among the opened files, you need to find the unpacked .png skin file. Found? Activate it.
- Now you need to choose the one you like from all the models. Remember that on the right is thinner, and on the left is wider.
- The "Confirm" button will allow you to activate the changes.
- It is done!

Download How to install a skin in Minecraft PE (Android, APK)
Similar:


Comments